15 May

|
Getting your Trinity Audio player ready...
|
VPS hosting is preferred when users are looking for the right balance between shared hosting and dedicated hosting.
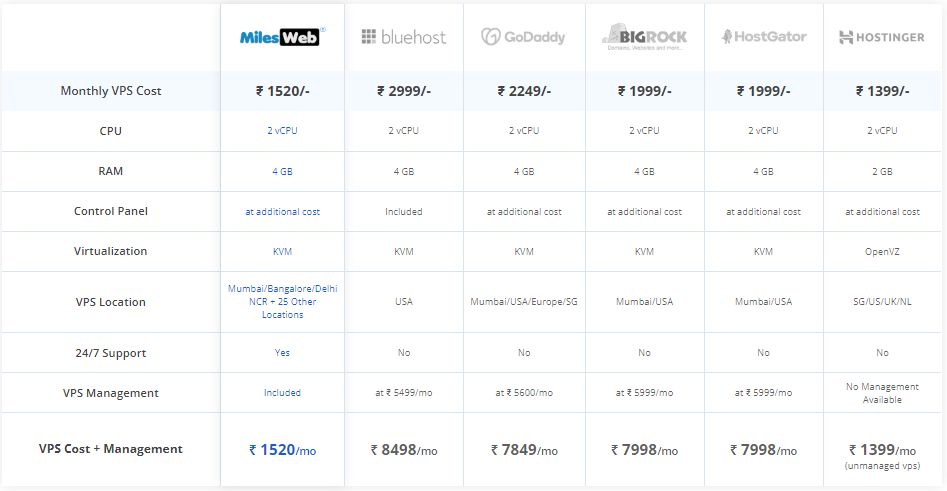
If you are looking for a reliable VPS hosting server for your enterprise, MilesWeb is the leading name. They offer Forex VPS, CyberPanel VPS, and others with managed and unmanaged support.
Here is why we support the statement that MilesWeb is a leading name in this industry.
Table: Head to head comparison

Setting up a web server on your Linux VPS hosting can seem like a daunting task, but with the right tools and guidance, it can be a straightforward process. In this guide, we will walk you through the steps needed to set up a web server and what is Linux VPS hosting.
Table of Contents
Steps to Install a Web Server On Linux VPS
Step 1: Choose Your Linux Operating system
The first step in setting up a web server on your Linux VPS is to choose your Linux distribution. There are many different distributions to choose from, each with its strengths and weaknesses. Some of the most popular distributions for web servers include Ubuntu, CentOS, and Debian.
Ubuntu is a popular distribution for web servers due to its ease of use and vast community support. CentOS is also a popular distribution for web servers due to its stability and security. Debian is another popular choice for web servers, known for its reliability and robustness.
Once you have chosen your Linux distribution, you can move on to the next step.
Step 2: Install Apache
The next step in setting up a web server on your Linux VPS is to install Apache. Apache is a widely used web server software that allows you to serve web pages to users who request them. To install Apache on your Linux VPS, you can use the following command:
sudo apt-get install apache2
This command will install Apache and any necessary dependencies on your Linux VPS. Once the installation is complete, you can start Apache by running the following command:
sudo service apache2 start
Step 3: Configure Apache
After you have installed Apache, the next step is to configure it. Apache’s configuration file is located at
/etc/apache2/apache2.conf
You can edit this file using a text editor such as nano or vim.
One of the most important configurations you will need to make is to set the root document. The document root is the directory where Apache will look for your web pages. By default, the document root is set to /var/www/html. You can change the document root to any directory you prefer by editing the following line in the configuration file:
DocumentRoot /var/www/html
Step 4: Install PHP
If you plan to see dynamic web pages, you will need to install PHP. PHP is a popular scripting language that allows you to create dynamic web pages by embedding code within HTML. To install PHP on your Linux VPS, you can use the following command:
sudo apt-get install php
This command will install PHP and any necessary dependencies on your Linux VPS.
Step 5: Test Your Web Server
After you have installed and configured Apache and PHP, the next step is to test your web server. To do this, you can create a simple PHP file that will display the current time when it is loaded in a web browser. Create a new file called test.php in your document root directory with the following content:
<?php
echo “The current time is ” . date(“h:i:s a”);
?>
Save the file and load it in a web browser by navigating to http://your-server-ip/test.php. If everything is set up correctly, you should see the current time displayed in your web browser.
Step 6: Secure Your Web Server
Once you have set up your web server, it is important to take steps to secure it. Some of the steps you can take include:
Keep your software up to date: Make sure to regularly update your Linux distribution, Apache, PHP, and any other software you are using on your web server.
Use a firewall: Use a firewall such as ufw to block incoming traffic to your web server except for the necessary ports (80 for HTTP and 443 for HTTPS).
Conclusion
After going through these steps, you can meet your enterprise-level VPS hosting needs. Many website owners want to create a custom server within the VPS hosting server, and the above-mentioned steps will make it true. Lastly, don’t forget to secure your VPS servers with SSL certifications. If you opt for MilesWeb’s VPS servers, you will get an SSL certificate free of cost.

